How to kill a chicken and what to do. How to properly slaughter a chicken and process the carcass? Methods for slaughtering chickens at home
Tired of the bustle of the city, many people move to live closer to nature and buy a house in the village or a dacha. Over time, having mastered all the tricks of growing various crops on their plot, they begin to think about how to provide their family with environmentally friendly food products of not only plant, but also animal origin. Simply put, they decide to fatten chickens, ducks and rabbits to produce homemade meat. Usually the first try as a farmer begins with raising young broilers. Their meat is very tender, tasty and early ripening (it takes no more than 60 days to gain weight up to three kilograms). But many who are not yet fully experienced “chicken keepers” do not fully know. Of course, an experienced adviser will not hurt in this matter. But what to do if you still had to meet one-on-one with the future “tobacco chicken”? In this article you will find useful tips. Photos of all stages will help you with this. Follow the directions and you'll get neatly plucked and gutted carcasses.
How to cut up a chicken.Stage one: from catching to scalding
1. The bird that you plan to slaughter for meat is usually not fed in the evening of the previous day. This is necessary so that the crop and entrails are not filled.

2. Select the largest individuals. If the bird is young, try not to damage the wings when catching, as it is very delicate and you can easily twist the limbs. Such a carcass will no longer be quite “first-class”.

3. For greater convenience during the moment of cutting off the head, make a special device. To do this, roll up the thick tin into a funnel, leaving a hole with a diameter of 5-6 cm. By dropping the chicken into it, you can easily cut it off with an ax

4. After all the blood has drained from the carcass and it stops convulsing (after 15-20 minutes), start scalding. Bring water to a boil, but the temperature should not exceed 80 degrees. Otherwise, the chicken's skin may peel off in pieces. Take the carcass and, holding it by one paw, dip it in hot water for one and a half to two minutes.
How to cut up a chicken.Stage two: from plucking to singeing the carcass

How to cut up a chicken.Stage three: evisceration

How to cut up a chicken.Stage four: from washing to packaging for storage
- Wash the chicken well, first with hot and then with cold water.
- After the liquid has drained, place the carcass in a plastic bag and then in the freezer.
But still, the most common option for using ready-cut poultry is not freezing “until better times”, but roasting in the oven!
Every poultry farmer has to face the question: how to cut up a chicken carcass. For many, only the speed of the unpleasant process is important. Few people think about the correctness of actions. Meanwhile, competent processing has many advantages.
Before hitting store shelves and tables, a chicken carcass goes through several stages of preparation. The following are produced sequentially:

Why is it so important to learn how to properly cut up a chicken?
The quality of carcass processing directly affects the taste of the meat. If the intestines or spleen are touched during gutting, the organ fluid will flow out and be absorbed into the pulp. Such chicken will have an unpleasant odor and bitter taste.
In addition, professional cutting skills allow you to use parts of the carcass as economically as possible. Knowing the nuances, it is easy to make preparations for a soup set, meat for frying, baking, salads, separate fillets for minced meat and pieces for feeding animals. For farmers, this is also an undeniable plus, since semi-finished products sell better than whole chickens.

Proper cutting is also rational from the point of view of allocating space in the refrigerator and freezer. The carcass takes up a lot of space, while even pieces are easily laid out like “Tetris”.
Finally, an organized, streamlined process takes less time and stress. Perfected movements are performed quickly, a minimum of waste eliminates lengthy cleaning.
Preparation for cutting
Before starting work, you need to prepare tools and space. Gutting is a rather dirty process, so it is preferable to cover the surface of the table, surrounding equipment and furniture with oilcloth. It is advisable to protect your clothes with an apron and put on cellophane or rubber gloves on your hands.
For the operation you will need:
- board. It is better to use an option made of flexible or hard plastic. Wood absorbs all odors and juices, and glass may not withstand pressure. If you choose a wooden option, you should wrap the device in cellophane or use a board exclusively for cutting meat;

- dish or pot. The removed giblets or finished pieces will be placed in the container. To make cleaning easier, you can immediately line them with cellophane;
- knives. There are special knives for gutting and cutting with a curved end. If this is not available, you can get by with wide and narrow knives made of thick steel and with a strong handle;

- cutting fork. Allows you to remove the heart, lungs, liver, intestines, crop, and stomach from the carcass without damage. The action occurs with a minimum of effort, unnecessary movements and dirt;

- kitchen scissors. Good for cutting tendons of wings and legs. Replaced with a knife.

This set is considered ideal, but you can get by with a couple of knives of different sizes. Tools must be well sharpened and washed before starting work.
When the tools are collected, the final stage of preparing the carcass is carried out:

Gutting
Preliminary operations are completed. You can begin direct gutting. It is advisable to carry out the process as soon as possible after plucking. This way it will be possible to avoid rotting and fermentation of waste residues in the gastrointestinal tract. This chicken processing step by step is as follows:

This is where the gutting ends. Processing of food giblets is carried out. Fat and arteries are cut off from the heart and lungs. The liver is freed from the spleen. The stomach is incised, everted, and the contents and inner layer of rough skin are removed. The resulting products are washed with running water.

A lighter version of gutting can be done using a carving fork. After removing the anus, crop and intestines, it is inserted into the carcass. It is important not to damage the organs. All connections will be cut off by the sharp edges of the device, the insides will remain in it, they will be easy to remove. With good skill, all films and “fastenings” can be cut with a thin, sharp knife. Then turn the chicken over a plate and shake lightly. The giblets will fall out on their own.

There is a trick for cases where the bird is not originally intended for cooking or selling whole. In this version, the process is accelerated by cutting off the legs and opening the abdomen immediately after amputation of the anus. The body will open completely and it will be easier to remove the entrails.
Video - Gutting a chicken or rooster in 8 minutes at home
Cutting chicken at home
The term “cutting” refers to the final processing of the carcass with cutting into pieces. This operation can be carried out in various ways depending on the purpose.
What's the best way to disassemble a bird?
The method for disassembling the carcass depends on the plans for the meat. The whole chicken can be grilled, oven-baked, or boiled. For other cooking methods, chopped versions are used. Different parts are suitable for different dishes, so choosing the type of parsing is a crucial step:
How to cut up chicken without waste
First of all, the carcass is washed under water and dried so that it does not slip in your hands. Then place it breast side up on a cutting surface. The following actions occur step by step:
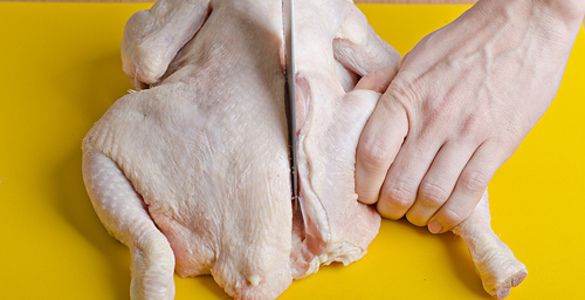
Step 1. Make cuts at the junction of the thighs and torso. Holding the leg, the leg is pulled back to separate the joint, slightly turned inside out and the final cut off from the body is made. This stage can be supplemented by separating the thigh and lower leg. The joint of the joint is felt with fingers and cut with a knife.

Step 2. Cut off the wings. Pull and turn them out in the same way as chicken legs. When the humeral cartilage comes out, cut it off from the carcass. The final sharp element can be cut off along the cartilage or left.

Step 3. Cut the breast lengthwise. Remove the fillet from the bone using a blade. You will get two pieces of pulp and a back connected to the ribs.
Step 4. Cut the spine down the middle. Cut off the ribs from the back. The step is optional; it is made if necessary to obtain smaller parts.
Step 5. Remove excess fat from the resulting chicken elements. Also done at personal discretion.

The result is:
- breast fillets, thighs, drumsticks and wings - for frying, boiling, stewing, baking;
- back, ribs, wing tips - for cooking broth;
- fat - for frying.
Video - How to cut chicken without waste
How to cut a chicken carcass into 8 parts
This cut includes 8 pieces. It is considered a classic. It can be modified by cutting the breast into 10 pieces. The ideal tools are a sharp knife and kitchen scissors.
Step 1. Find the joint of the hip joint in a carcass lying on its back and carefully cut through the flesh. Then insert the knife into the joint of the cartilage and cut it. Or pull the thigh with your hands until the bone pops out of the joint.

Step 2. Turn the chicken onto its stomach. Make an incision along the flesh of the thigh along the back. It should go around the entire perimeter of the thigh.
Step 3. Separate the drumstick and thigh at the knee joint. A clue to the correct location of the incision is the fatty stripe at their border.

Step 4. Cut off the wings. Feel the joint between the carcass and the wing under the breast. Point the knife directly at the joint. The separation will take place without any extra effort.

Step 5. Remove the breast. For this operation it is better to use scissors. This way the cut will be as neat as possible. Place the carcass on its side. Cut through the border of the back and breast along the fat strip from beginning to end. Repeat on the second side.


Step 6. Remove the sternum bone. Turn the breast skin side down. Make longitudinal cuts on both sides of the cartilage. The meat will come away from it. Through the resulting incisions, grab the bone with your fingers just above the junction with the cartilage. Pull forcefully. The hard elements will leave the soft fillet.

Step 7 Cut the resulting breast vertically into two parts. It is most convenient to do this from the skin side.

The result is 8 pieces:
- 2 breasts;
- 2 hips;
- 2 drumsticks;
- 2 wings.

The back in this version is considered a waste, but it can be used for cooking broth.
How to cut chicken into equal portions
For such cutting you will need to fill your hand. It may not work out the first time. Only persistent training will ultimately allow you to achieve even, beautiful pieces.
Step 1. Place the carcass on its back. Cut off the legs at the cartilage joints. The process will become easier if you press the leg against the work surface, make an incision in the flesh and slightly turn the thigh out. The cartilage will open and it will be easier to find the place of articulation.

Step 2. Cut the drumstick from the thigh at the bend.
Step 3. Divide the remaining carcass into 2 halves. A pair of vertical incisions will be required along the spine and sternum (on either side of them).
Step 4. Cut the pieces obtained in the third stage horizontally in the center into 2 parts each.

The result will be 8 pieces, almost identical in size:
- 2 drumsticks;
- 2 hips;
- 2 lower breast halves;
- 2 upper breast halves with wings.

This treatment looks especially impressive when grilled or frying in a pan. The bones with pieces of meat remaining in the waste are suitable for broth.
Separating meat from bones is useful when preparing minced meat, meat rolls, and semi-finished products from the pulp (breast and thigh fillets). It is important not just to be able to cut meat, but to maintain a presentable appearance of the pieces. The highest aerobatics is considered to be removing bones from the entire carcass without damaging the skin. Farmers supplying chicken products to restaurants may encounter this unusual order. Such skill is appreciated and is an undeniable advantage for the seller.

For such processing, the knife must be as sharp as possible. It is advisable to sharpen it specifically for this purpose. The tip needs to be thin. Scissors will also come in handy.
Public method
| Description | Photo |
|---|---|
| Incise the skin vertically along the entire back. You can start in the same way with the breast, but this increases the risk of tearing the carcass. The bones in the dorsal part are located very close to the skin and, when pressed, easily damage it. |  |
| Using gentle movements of the knife, begin to peel the meat from the skeleton. The direction of movement is from the tail from bottom to top. Break the ischium, hip and wing joints. Expose the ribs. Help yourself move the pulp with your hands. |  |
| Release the femur completely. To do this, trim the veins in a circle and move the meat with your fingers. |  |
| Maintaining the connection between the thigh and the body, scrape off the flesh with a “stocking” to the outer cartilage. Upon reaching the bottom point, cut the upper joint. |  |
| Turn out the resulting stocking. Repeat all steps on the second side. |  |
| Trim the ribs with scissors. Remove the fork and keel bones, trimming the remaining joints. |  |
| The wings remain on the carcass directly with the bones or are cut from the skin in an even strip. The process is complete. |  |
Private method
| Description | Photo |
|---|---|
| Through the lower hole in the carcass (through which gutting is also carried out), cut the tail and expose the ischial frame. |  |
| Make an incision with jerky movements up to the upper femoral cartilage. For convenience, tuck the skin and pulp a little during the process. Break the joint with a blade at the junction. |  |
| Trim the veins around the entire circumference of the ham bone. Break the maple joint at the point of contact with the shin. Repeat the above on the other side of the carcass. |  |
| Trim the meat from the ribs to the neck, continuing to tuck the skin with the flesh already removed. |  |
| If there is a neck, pull it out with a sharp movement of your hand. Cut the breast fillet from the carcass and break off the wing joints. Remove the fork bone. |  |
| Peel the flesh of the drumstick around the circumference, cutting the ligaments. Cut off the bone before the cartilage. |  |
| Take out the skeleton. Turn out the skin and meat. |  |
The closed version is ideal for stuffing a carcass. Using the above diagram, you can peel meat from chopped pieces. The only difference is that you don’t have to worry about the integrity of the skin.
Video - Removing bones from chicken
Video - How to remove bone from chicken leg
Secrets of successful chefs
All chefs have their own tricks when cutting poultry. According to world-famous masters, it is useful to pay attention to the following details:

Everyone who runs a farm is faced with the need to slaughter chickens. This is especially true for owners of farms and large business enterprises. After all, slaughtering poultry is the first step in obtaining tasty and healthy meat. Slaughter with an ax is considered one of the most humane. This is because the chicken's airways are instantly cut off. She barely has time to feel the pain.
Preparations before slaughtering chickens
Preparation should begin one day before the expected day of slaughter. To do this, suitable birds are selected from the flock and placed in a thoroughly cleaned separate room or cage. To prevent bruises on the carcasses, catching should be done by the legs. You need to touch the stomach, wings and chest with extreme care; damage appears on them faster than on other parts of the body.
During the day, chickens are not given food, but only water, which helps improve digestion. This helps naturally clear food debris from their gastrointestinal tract. To do this even faster, you can keep a rooster or chicken until slaughter, giving water with Glauber's salt dissolved in it.
Another way to speed up metabolism and digestion is to use light, which is left on for a day. 24-hour lighting causes disorientation, triggering metabolism in the right direction. Depending on the number of chickens and the skills of the owner, a suitable method is selected. The main selection criterion is the time spent on the procedure and minimizing the suffering of the bird.

External method
The best and easiest way for beginners is to cut off the head of a chicken. For this you need a sharp ax. To make the process easier, the chicken is secured in a bag with a pre-cut slit for the head or the legs are tied. After which, holding tightly with one hand, the chicken is placed on a block or other stable surface made of wood, so that there is free access to the neck.
To reduce the bird's suffering to a minimum, you need to chop off the head with one blow using a sharpened ax.
If you are afraid that you won’t be able to cut off the head right away, you can first stun it before slaughter by hitting it on the head with a heavy blunt object. Or disorient the bird by spinning it around its axis several times. In each of these options, the chicken must be held by its legs with its head down. Next, you need to fix the head with one hand, and cut off the head with the other in one of the following ways:
- By making an incision a couple of centimeters below the lobe, stopping the movement of blood in the arteries. The incision will be about two centimeters.
- Make a through hole a centimeter below the lobe, then turn the knife and cut all the vessels.
Carcasses slaughtered in this way are not stored for a long time. Due to the presence of bacteria that can enter the chicken through the cut neck. To preserve chicken meat, place it in the refrigerator.


Internal method
The internal method is most often used when chickens are killed at a poultry farm or large farms where meat is sold on a regular basis. But you can also use this method at home.
The slaughter of broilers internally is relevant if it is carried out in large volumes:
- The bird is stunned. For subsequent bleeding and cutting, they are hung upside down.
- With one hand, hold the head towards you with the beak, while pressing with your fingers between the lobes and eyes on both sides (if pressed correctly, the beak opens). Another, using a knife or scissors with sharp ends measuring 0.6 cm wide and 6 cm long, cut the veins and arteries.
- Finally, the scissors are directed into the brain.
To slaughter chicken that will be stored for a long time before cooking or selling, they use a technology called “splitting.” It involves the following actions:
- A live chicken is grabbed by the head, which is turned to the side.
- With a sharp movement, the slaughterer inserts a long and well-sharpened blade into the mouth - it hits the place where the pavement and jugular veins connect.
- A small incision is made, after which the blade is pulled out.
- The injection is made a little to the right to get into the anterior region of the cerebellum.
By slaughtering a chicken in this way, you can quickly relax the muscles of the bird and facilitate the procedure of bleeding the carcass. In addition, this makes it easier to process and cut up the bird after slaughter: weakened muscles do not hold the feathers firmly.
For every broiler farmer, slaughtering them is a normal process. Experienced poultry farmers claim that slaughtering chickens does not present any difficulties, but the taste of the product will depend on the method of carrying out such a procedure.
Spoilage of chicken occurs due to rotting and liquid containing poorly digested feed, which leaks out when the internal organs of the bird are separated. Before slaughter, chickens are prepared for the procedure.
How to properly kill a chicken at home?
First of all, birds for slaughter are carefully selected and prepared, separating them from the flock and creating special living conditions. A few hours before slaughter, feeding the chickens is stopped, but they must be given water. The liquid normalizes digestive processes and also cleanses the gastrointestinal tract.
If there is a lack of water in the chicken’s body, the rate of digestion of food will be reduced. There will also be an increase in overall fluid loss, which will lead to a decrease in poultry body weight.
Note! To quickly cleanse the gastrointestinal tract, poultry farmers give broilers a laxative - a solution of Glauber's salt. In the absence of such a substance, it is recommended to use wheat bran or flour. In a chicken’s daily diet, the amount of such ingredients should be ¼ of the food.
To further speed up the digestion process, the lights should be turned off in the room where the chickens are selected for slaughter. Under such conditions, the bird will begin to experience disorientation, and its intestines will digest food faster. There should be 2-3 drinkers on the floor next to the poultry.
Chopping off the head
In most cases, poultry farmers at home resort to the method of cutting off the heads of birds using a large blade or an ax. In the process, the windpipe, blood vessels and arteries located in the neck are cut. The bird's death is instantaneous, so the method of cutting off the head is considered relatively humane.
This method is used only if the chicken will not be stored for 1.5-2 weeks before use. When a head is cut off, microorganisms enter the wound, which leads to rapid spoilage of the product.
Stun
The method of stunning, or anesthetizing, a bird is another method of slaughter. Stunning puts the broiler into shock, its movement stops for 5-7 minutes - this is the time required for the slaughter procedure. Gutting a bird that has previously been subjected to stunning is a more progressive method, because its muscles are completely relaxed, due to which the bleeding of the carcasses occurs better and faster.
The stunning method helps create optimal conditions for the subsequent slaughter of chicken. The farmer will achieve high productivity with minimal expenditure of physical strength.
Poultry farmers have identified several methods of stunning poultry:
- electrical anesthesia;
- mechanical method (use a hammer to hit the chicken on the head);
- carbon dioxide anesthesia;
- stunning with drugs (for example, sodium barbiturate).
Note! It is recommended to use the stunning method if the adult chicken is heavy or is a large breed.
Through the beak
A more humane method of slaughtering broilers is represented by killing through the oral cavity (beak), during which the “split” technology is used. You can resort to preliminary stunning, which is most suitable for large individuals.
If poultry is stunned in advance, this will help improve the sanitary slaughter area. Due to the fact that the carcass is effectively and quickly bled, chicken meat will retain its presentation. To stun a bird before killing it, you need to hit it on the head with the back of an ax.
Slaughtering a bird through its beak will require some skill. You should grab the broiler by the head with your hands so that its beak is directed towards the farmer. Insert pre-sharpened scissors or a narrow knife blade into the broiler’s beak, which should penetrate the junction of the paired veins on the neck.
After the cut, the tip of the knife should be pulled back and a second injection should be made on the right side. The injection through the palatoglossus muscle should reach the anterior part of the small brain. To bleed the carcass, it is necessary to hang it by its legs in any convenient place. Once the process is completed, a cotton pad is placed in the broiler's beak to absorb the remaining blood.
External method
During this method of slaughtering a broiler, the broiler is grabbed by the head, the beak is held with one hand, and the skin 25 mm below the ear is cut with a sharp knife. The blade should be driven as deep as possible until it cuts the facial and carotid arteries, as well as the jugular vein. The length of the cut should be 15-20 mm.
Important! Before killing a broiler, you need to carefully sharpen the knife so that it goes completely through the chicken head and forms a through hole.
The best way to slaughter a bird using a cone
How to properly pluck a carcass
After bleeding the chicken carcass, it is immediately plucked. First, you should pluck the tail and feathers, since this is the easiest thing to do, and then proceed to remove the feathers on the paws, neck and chest.
Feathers must be pulled out along their growth line. It is strictly forbidden to grab most of the feathers, because the delicate skin of the carcass can be torn, and its presentation will be lost.
Scalding a carcass
The bird's wings, neck and head must undergo additional processing - they are scalded for 2.5 minutes. After scalding is completed, you can begin plucking the feathers. Remains of fluff and hemp are removed with a sharp knife.
Removing litter
After scalding and removing the feathers of the chicken, all droppings are removed from its anus. To do this, you should press on the belly of the carcass, after placing a cotton swab into its oral cavity, which will absorb the remaining blood. If, when removing droppings, it gets on the chicken’s feet, they should be washed thoroughly, but it is strictly not recommended to completely wet the carcass.
To remove thin feathers, the broiler carcass is scorched with a gas burner or over a fire. Before treating a carcass with a smoking flame, it should be rubbed with wheat flour to prevent the formation of soot on the skin.
Gutting a bird
Before you start, you need to soak it in water at room temperature for 15 minutes. This is necessary so that the product does not acquire a pink color or turn burgundy due to the saturation of the vessels with blood cells.
The separation of food and non-food organs from a broiler consists of several stages:
- Place the chicken on its back.
- around the cloaca using the ring method.
- Following the ring one, the size of which reaches 5 cm.
- Slowly remove the internal organs: first remove the hind intestine with the stomach, then remove the remaining entrails.
Note! The initial section of the small intestine from the stomach must be cut off with extreme care to prevent tearing.
How long to keep broilers before slaughter
The poultry farmer must independently determine the timing of slaughter of broilers, but the starting point of slaughter is an increase in body weight. The killing of poultry begins after 85 days from the birth of broilers; their body weight should reach 3.5-4 kg. Raising chickens over 85 days old is unprofitable, as their development begins to slow down.
Before killing a chicken, it is necessary to pre-treat it. It is strictly forbidden to give antibiotics to poultry 23 days before slaughter, and 13 days before slaughter, completely exclude gravel and fish waste from the diet.
Carcass storage
Poultry meat is stored in the freezer or refrigerator. If there is not enough free space in the refrigerator, it is recommended to move the meat to the basement, but in such conditions the product can be stored for no more than 7 days. To protect chicken from the formation of rot and mold, it is wrapped in gauze or a paper towel, previously soaked in a vinegar solution.
With the onset of winter, broiler carcasses are taken out into the yard or onto the balcony, where they can lie for a whole day. They should then be soaked in cold water and then taken outside again.
It is recommended to do this procedure 2-3 times, as it helps preserve the taste of the chicken for a long time. Once freezing is complete, the broilers are wrapped in a clean paper towel and placed in a cool room.
Conclusion
Slaughter should be approached as responsibly and carefully as possible. It is necessary to follow the rules for preparing poultry for slaughter, processing the carcass and subsequent storage of meat.
We slaughter broiler chickens, cockerels and laying hens that are over three years old. For this entire category, the slaughter principle is the same.
Preparing poultry for slaughter
By the time of slaughter, the crop and intestines should be free of food. Chickens for slaughter must be placed separately and stopped feeding 10-12 hours before. Just don't feed in the evening. At night, the room where the bird is kept must be illuminated. At this time, they undergo intensive release of the contents of the crop and intestines. Water must always be in the room.
Chicken slaughter
We slaughter chickens simply - we cut off the head with an ax.
In order for all the blood to drain, it must be hung by the legs or placed upside down in a bucket. If you are slaughtering a broiler chicken, and it weighs more than 4 kilograms, then during slaughter it needs to tie its legs and put its wings behind its back.
Plucking chickens

Keep the chicken in boiling water for no more than 1 minute, otherwise the skin will be torn off when plucking. Next, we proceed to the plucking procedure. The feather must be pulled out in the direction of growth, and not vice versa, otherwise the skin will tear. After the carcass is plucked, it must be scorched with fire. We singe it with a gas burner.
Butchering

Cutting off the paws at the joint
For gutting, I make a slit in the neck and pull out the trachea and esophagus.


I make a small incision above the anus and another incision in the middle of the abdomen. I insert my hand into the incision and grab the heart, liver, esophagus with trachea, and carefully, so as not to damage the gall bladder, we remove everything with giblets from the carcass.


I cut the broiler chicken into pieces. I cut off the breast, legs, and necks separately. I lay out the pieces for frying and the pieces for soup separately. This is very convenient for the housewife and you can also put everything in the freezer economically. Meat from broiler chicken can be added to minced meat for dumplings. These dumplings turn out juicy and very tasty.